This post contains affiliate links. That means if you click or make a purchase, I make a little cash at no extra cost to you. I’ll probably use it to feed my dog. Thanks for feeding Sadie. (Don’t worry, she gets food regardless)

When I first started my blog, I was like a sponge soaking up any information I could find. I read about plug ins, widgets, themes, strategies, content writing, promoting, social media, and more. You name it, I read about it, and consequently tried it. After a few months of blogging, I can look back and see what the best tools were for me as a beginner food blogger. I want to save you all that time, so I’m sharing the cliff notes of what I learned to help you as you’re starting your food blog!
The goal of this post is to give you all of that information without having you read 57 articles like I did (ok it was probably more than that). Blogging is a lot of work. It’s fun, and it’s a lot of work. And if I can help you improve your existing blog or help you if you’re just starting out, then I’m a happy camper.
Looking back at the beginning stages of my blog, I’ve rounded up the most helpful widgets and resources that I used to get my blog running. These won’t necessarily work for every blog out there, but I want to share what worked for me in hopes that it helps you, too. This post contains affiliate links, which means if you make a click or purchase, I make a commission at no additional cost to you. I only recommend things I personally use and love!
Another note: most of all these tools I recommend are FREE, because I sure as heck didn’t want to be spending money on my blog when it first started, and I’m sure you don’t either. There are some tools I pay for now that I’m more established, and I’ll talk about those towards the end.
Still need to start a blog? If you know you want to monetize your blog and make a business out of it, you’ll need to be self hosted. Bluehost offers hosting and a FREE domain for as low as $2.95/month. It’s what I use here on my blog and I recommend it to any new blogger. Click here to get started and set up your blog in minutes!
Plugins
What they are: This sounds silly, but the best way to describe plugins is that they’re like apps for your blog.
You can download plugins to back up your blog, protect it from spam, insert your Instagram feed, and more. See the widgets to the right of this post? The about me widget, search bar, and my Instagram feed? Those are all from plugins. Get the idea?
It’s tempting to download any and every plugin you see that’s popular, but you want to start out simple with what you need until you figure out what works best. Installing too many plugins can also slow down the loading speed of your blog, too. No bueno. Your readers want a page that loads fast. Here are the plugins that are most helpful for starting out your blog.
Google Analytics
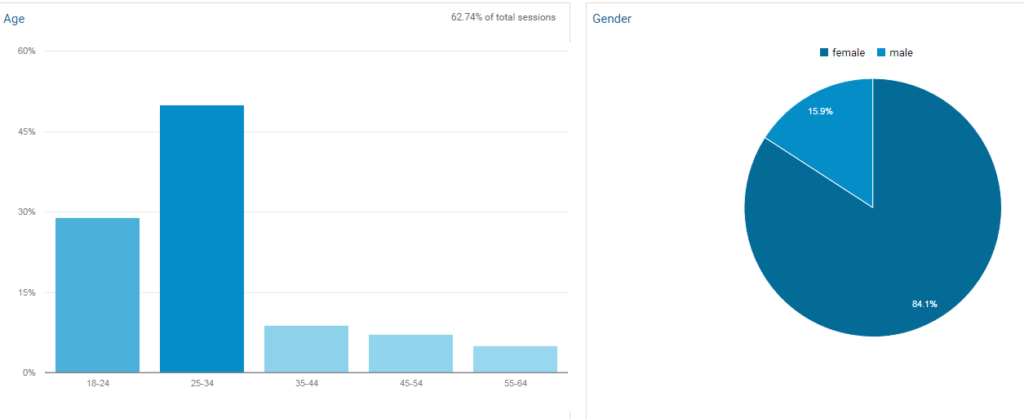
Using Google Analytics allows you to see every piece of data that you could possibly want to about your blog. You can see what your readers love the most, where they’re coming from, what kind of device they’re on, and more. It’s incredibly useful in the beginning because you use it to see what topics are most popular among your readers, and also the demographics of your readers. This will help you as you continue to develop your blog because you’ll know how to write for your audience. This plugin will link your blog to your Google Analytics account in a snap.
Google Analytics great to use to monitor the growth of your blog, too. Sometimes on days I’m feeling discouraged, I’ll go in and look at my statistics from month to month. It always makes me happy to see those line graphs going up, and see how the numbers really have increased. It’s always nice to see that your hard work is paying off! Once you start to work with companies and some affiliate programs, they use your google analytics numbers as a reliable source for verifying your page views and number of visitors per day.
Here’s a neat example of how you can see the demographics of your readers:

Instagram Feed WD
This plugin is so simple to use, and you can see it in my sidebar to the right. I’ve used it from day one to display my Instagram feed. There’s an option for a paid membership as well, which allows you way more customization options. For me, I’ve found that the free version does just fine. You can adjust the number of columns and rows, and other simple things like that.
Pinterest “Pin It” Button
For most blogs, Pinterest is the #1 traffic source. When you write good quality posts with a good pinnable image, it gives your blog post life even long after you’ve hit publish. This is huge for bloggers. If you have a post with affiliate links, you want people to continue coming back to it, making it a form of passive income. By installing this “Pin It” button, you give your readers an easy way to pin your content and make it visible to others (so important!) This plugin also has a paid option, but for beginners you’ll be just fine with the free one.
YoastSEO
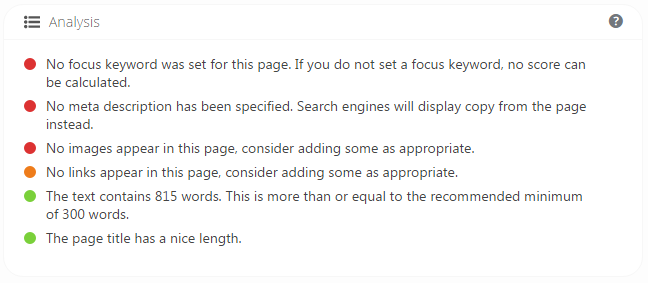
Y’all if you only download one plugin off this whole list, make it this one. SEO stands for Search Engine Optimization, and you’ll need to learn about it as a blogger. To summarize it in a sentence, you want your blog content to be written in a way that search engines like Google will like it. You’ll want to include key words, avoid the passive tense, avoid long sentences, and more. YoastSEO is a little bot (I’m going to call it that because it sounds cool) that hangs out at the bottom of your blog post as you’re typing it and analyzes your words. It will tell you all kinds of ways to improve your writing, like this:

You’ll find that your main goal in LIFE will become making those red and orange dots turn green. This is the single most helpful tool I use when writing my blog posts, and you need it too.
Related Post Thumbnails
This plugin isn’t as fun and shiny as the others, but it’s on almost every blog I’ve seen, including mine. At the bottom of your blog post, it displays “related posts” that your readers might be interested in when they finish the post they originally came for. It allows readers to find more of what they’re there for (good for them) and in turn keeps them on your site longer (good for you). It’s a good thing to have to keep readers around during their viewing session.
Other Tools
Let’s venture outside of WordPress next. As a blogger, you’ll utilize a variety of other websites and programs to help you run your blog more efficiently. The following are my favorite tools to use outside of WordPress.
MailerLite
Right off the bat, you’ll want to set up what you need to start building your email list. I started off with MailChimp, but found that MailerLite had a lot more options for customization. You can create pop-ups, forms, buttons, newsletters, and more. The program is extremely user friendly and way easier to use than MailChimp (in my opinion!). Some people love MailChimp, so you really just have to find the email program that works best for you. MailerLite is free for up to 1000 subscribers, and they have small business options for any number of subscribers above that.
You may hear some bloggers talk about ConvertKit, which is what I hope to upgrade to someday (it’s a paid membership). If you want to bite the bullet and go all in, you can absolutely do that! I’ve heard nothing but good things about ConvertKit. For a beginner, I would say MailerLite does all you need.
BoardBooster
If you utilize one tool that I’ve talked about on this page, make it this one. BoardBooster is this smart little machine that is a Pinterest mastermind. It will re-pin content to your boards to keep them visible to others, and it’s smart enough to delete duplicate pins, know which pins do better, and more. You’ll also want to join some group boards in order to increase your pins’ exposure, and BoardBooster can be set up to do all that pinning for you automatically. It’s seriously so helpful and will increase your Pinterest influence SO MUCH. Try their free trial, and if you like it you can upgrade (I did!). Right now I’m at BoardBooster’s lowest level of 500 pins per month for $5 a month. Seriously so worth it to up your Pinterest game.
Tailwind
Another tool to greatly improve your Pinterest game! Tailwind automatically schedules pins for you and is smart enough to pin them at peak times for maximum exposure. You can even select an image and pin it to multiple boards with one click instead of doing it over and over. I’ll be honest with y’all- I used up my free trial and am waiting to purchase the membership. Give it a try and see if you like it!
Update: Once I finished my Tailwind trial, I started to see my analytics tank from the peaks they were at. Bummer. I’ll definitely be purchasing a Tailwind subscription, and in hindsight should have done it a while ago when I decided to get serious. Nonetheless, it’s worth the investment .
Canva
Creating high quality, pinnable images is KEY to bringing in traffic from Pinterest. I just realized I’ve talked about Pinterest so much. It’s a major traffic source, so it’s worth investing your time in. In fact, I dedicated the entire month of December 2016 to Pinterest, and increased my pageviews by 50% from November to December. Back to Canva. I use it to create my pins because it’s FREE and so easy to use. I tried out PicMonkey, and while it was fantastic, it costs money, and also I found I could do everything in Canva that I was doing in PicMonkey.
Canva does have a paid option that I will likely upgrade to eventually since it allows you to resize your projects (it’s a pain when you’re almost done with a pin and realize it needs to be bigger or smaller), keeps templates for you, and other neat stuff.
That’s it! My most used resources as a beginner food blogger! I hope they help you even in the smallest way. If blogging is what you love, KEEP DOING IT! Keep writing and keep chasing after that dream.
Thanks for reading,


Leave a Reply